T
The plan was for Jesse and I to build teardrop the trailers but the plan evolved. Actually it had a life of its own and it kinda got away from us. Jesse and I decided that we wanted to build something with a bit more room than a teardrop trailer. We also wanted to include more cool features than a teardrop could accommodate. So we finally settled on a tiny gypsy caravan.
Since July Jesse and I have put a ridiculous amount of hours into this and it's still not done.
 We wanted to create a space that was filled with light and color and coolness. So the following is a tour of our journey and some of the details.
We wanted to create a space that was filled with light and color and coolness. So the following is a tour of our journey and some of the details.
we emptied out Jesse's garage, bought the best cheapo tools we could afford and started building workbenches.

Once the shop was together we bought a 5'x10' flatbed utility trailer and began designing.
The basic design was inspired by the Romani Gypsy vardos but we made no attempt to follow anything traditional as this was intended to be a modern gypsy caravan for modern gypsies.
We drew from many eclectic influences. The floor is solid American hickory. Each board is uniquely beautiful.
For the galley countertop we chose a small hand-painted sink and ordered a box of mixed hand-painted Mexican tiles. Neither of us had ever laid tiles before and it was a really fun new experience.

The roof isn't on yet in this photo. Some of the carving in the beams and braces is visible here.

Finished and grouted!

Still need to find a faucet and do the plumbing.
Once the walls were up we began work on the first stained glass window, an octagon next to the bed area. After cutting the 22 1/2 degree corners I glued it and clamped it together with a ratchet strap.

The wood frame was put in place and the the glasswork began. This is the completed star window as seen from inside.

The interior of the caravan is being left natural wood and the outside is painted for color, protection from the elements and ease of maintenance. All of the gingerbread and scrolly bits are handmade. Most of the decorative carving was done freehand with a router. The exception to this is the carved work on the door which was created with a router, a flex-shaft Dremel and tiny little machinists files.
The main panel on this side of the door is a Phoenix bird rising from the flames. All around the edges of the door are Asian style clouds, a sunrise along the bottom, and the moon and stars at the top. The door itself is an assymetrical design with a kind of Arabian temple shaped window. The door jamb trim is deeply router carved.

This shot shows most of the door. It isn't hung yet here, just held in place with temporary stops.

This next photo shows the free-form hammered copper backplate set with glass bits and the glass doorknob. The backplate is set with lots of little brass nails all around the edge.

Here is the door on the workbench as it's being carved. Across the bottom is the sunrise, with Asian style clouds climbing up the edge and the Phoenix in the center panel. The window hasn't been cut out here yet.

This shot shows the door turned over and my sketch for the dragon that will go in the main panel on the inside of the door.

Cypress trees being carved up one side.

The moon and stars along the top. When the carving was completed the door was stained a beautiful mahogany color called Jatoba. The door has weeks of work in it and there is still more to do.

This is the dragon side of the door, again encircled with asian style clouds and cypress trees. Next to the door is the beautiful little wood stove that we ordered from Canada. This is really a lovely little airtight stove with brass trim. It sits on a pedestal that holds a stack of the 7" "logs" that fit into the stove. On the sides are a complete set of miniature stove tools. the stove pipe is double-walled stainless steel. We can't wait to fire this thing up!

A view through the temple shaped window opening after being cut out of the door.

This is the glasswork on the workbench before wrapping the edge of each piece with copper foil and then soldering the whole thing together. I use little pieces of painters tape to hold everything in place to get it all fitting together right.

The finished glasswork for the door. Lots of bevels and various textured clears and a few sweeps of color. I suspect it's gonna be dazzling when the sun hits it.

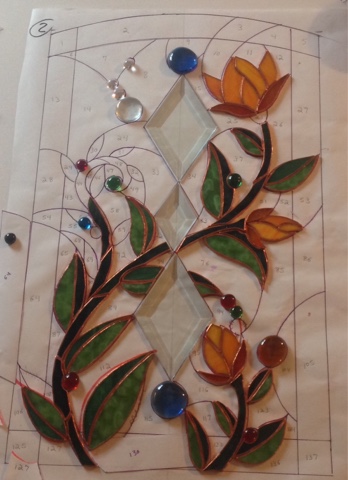
The drawing below shows two of the four panels for the bay window. Somehow, I had it in my head that these would be relatively simple designs...but I was wrong....these four panels ended up having almost 500 pieces of glass total. Jesse and I worked on the first panel for 10 days to complete it.

Here the flowers and leaves of the first panel have been cut, grinded, and foiled.
The first panel for the bay window completed and held in with temporary stops.

Two done, two more to go! Seen from the inside, this is where the head of the bed will go. When the other two panels are finished it should be a glorious place to wake up in the morning!

The bay window as seen from the outside as it currently is. Also shown is the carved and painted sunrise mounted on the front.

We found these beautiful lamps in a second hand shop, so tarnished we couldn't tell if they were real brass or not. They are! Got em for $2.50 each! Polished them up and made stained glass flame panels to go inside We absolutely love them! We are going to make two more with the stained glass panels to go on each side of the door under the overhang. Inside is another one without the flamey parts, to light up the coffee bar area.


Below, Jesse painting under the eaves.

Night time in the shop...just the carraige lamp lit. I am looking forward to doing some decorative painting on those wheels and fenders.

We put a generous overhang above the door and made these filigree supports. In this photo the roof isn't finished and parts of it are still being held on with clamps.

Pardon the clip on light in the next photo. This shot shows the view from the bed area, (which isn't completed yet). It was important to us that one could sit up in bed and watch the fire in the wood stove.

This view is looking from the entryway toward the bed area. Part of the platform is there and we've put the curtains from my van in to simulate the curtains we don't have yet...but we have the tassels! Eventually the completed bed will be in with a nice place to sit up and read.
Much remains to be done on the inside of the caravan. We still have to finish the bed, build the shelving, a heat shield for behind the wood stove, and the stovepipe needs to be put through the roof. Also, plumbing for the sink,recessed lighting and wiring, enclose under the counter, and build the coffee bar cabinet for the cappuccino machine.

Wow....
ReplyDeleteIt seems like a long time since I got any emails so I feel like there is a ton to catch up on.....and did I ever get it.
As close as I come to expressing my artistic side is stained glass so a appreciate the challenge of 500 pieces of tiny glass cut and ground and fit together like a glove....how many round pieces chained together?....lol
I love copper and always feel a moment of sadness knowing I will be covering the copper foil with solder of a different color.
Love the trailer and I love that you share so much of the detail with others.
thanx for your comments. yes, i usually use a copper patina because i love the look of it too. all the windows in the caravan will be treated with copper patina. thank you
ReplyDelete1
Barry & Jesse - your creative and joint efforts are spectacular! Thank you for sharing the process - it really showcases all your hard work, skills and ingenuity. Congratulations!!!
ReplyDeleteI'm saving up for a simpler more rustic style one when you are both ready to take orders. :))
Gypsy life Blessings,
SunJay
wow, Marion and I just finished gawking at you and Jessie's creations....not surprised at how far over the top it is....glamping.... ??? not sure will have to google it... anyway tried to call you and went looking for your blog... and found it.... hope to hear from you...
ReplyDeleteMarion and Fred